Tuesday, May 28, 2013

Notes of Encouragement for End of Grade Testing

Notes of Encouragement for EOG Testing
As the end of the school year approaches, many children prepare for end of grade testing. The EOGs, as many call them, may elicit fear of failure for many kids. Can they bubble what they have learned on an answer sheet?

Giving a child encouraging words can be a great gift. Taking the time to write a personal note can mean so much to a child. Approaching an evaluation with a positive attitude can go a long way toward helping a child to feel more relaxed.

These free printable notes of encouragement are specifically related to EOG testing. They are small, colorful, and can easily be tucked into a backpack, lunch box, or desk as a surprise to let a little one know that you are thinking of him or her on End of Grade testing days.

Directions:
  1. Click on the image below to enlarge.
  2. Choose file - print.
Printable Notes of Encouragement for EOG

Find more free printables, scavenger hunts, and articles at Katrena's Wildflower Bouquet site map.

Sunday, May 19, 2013

Quick & Easy Fun Flaming Tongues of Fire Pentecost Craft


Fun and Inexpensive Tongues of Fire Craft © Katrena
Pentecost brings with it images of tongues of fire. A fun way to bring that image to life is to make tongues of fire that can dance, swirl, and float!

This craft project is very inexpensive – the supplies I bought at a Dollar Tree could make 12 for $5.00. These "tongues" are versatile and might also be used with a dance ministry or drama, and they are easily customized for children of different sizes and abilities. The kids can develop teamwork skills as they make the craft. With very few supplies, there is little clean up time and almost no mess.


Supplies for Tongues of Fire Craft
  • Streamers (I bought 2-packs of red, orange, yellow)
  • Bracelets (I bought 6-packs in the party favor section)
  • Stapler with staples
  • Scissors (optional – we simply tore ours to the desired length)
Interactive Ways to Encourage Children in Church © Katrena
Directions for Making Tongues of Fire Craft
  1. Roll out red streamer and cut or tear to the desired length (32-inches worked well for my kids – you might want to go a little shorter for preschoolers)
  2. Repeat two more times (total of 3 separate red strips)
  3. Roll out orange streamer on top of the red strips and cut or tear the same length
  4. Roll out yellow streamer on top of the red/orange strips and cut or tear the same length
  5. Stack the three layers together (total of 9 strips together)
  6. Fold the edge of the 9 strips together over the edge of the bracelet and staple 2-3 times

That's it. Encourage the children to use their imagination as they move their tongues of fire and their bodies. Add some Pentecost music and you'll quickly have flaming tongues that the kids can enjoy as they learn about the Bible in a fresh and new way!

Find more inexpensive crafts, printables, scavenger hunts, and more at Katrena's Wildflower Bouquets site map.

Wednesday, April 10, 2013

Katrena's Scavenger Hunt #1 for Teachers

Scavenger Hunt for Teachers by Katrena

So, you're a teacher looking for a quick and fun indoor activity for your students? I've got you covered with this fast and super simple scavenger hunt.

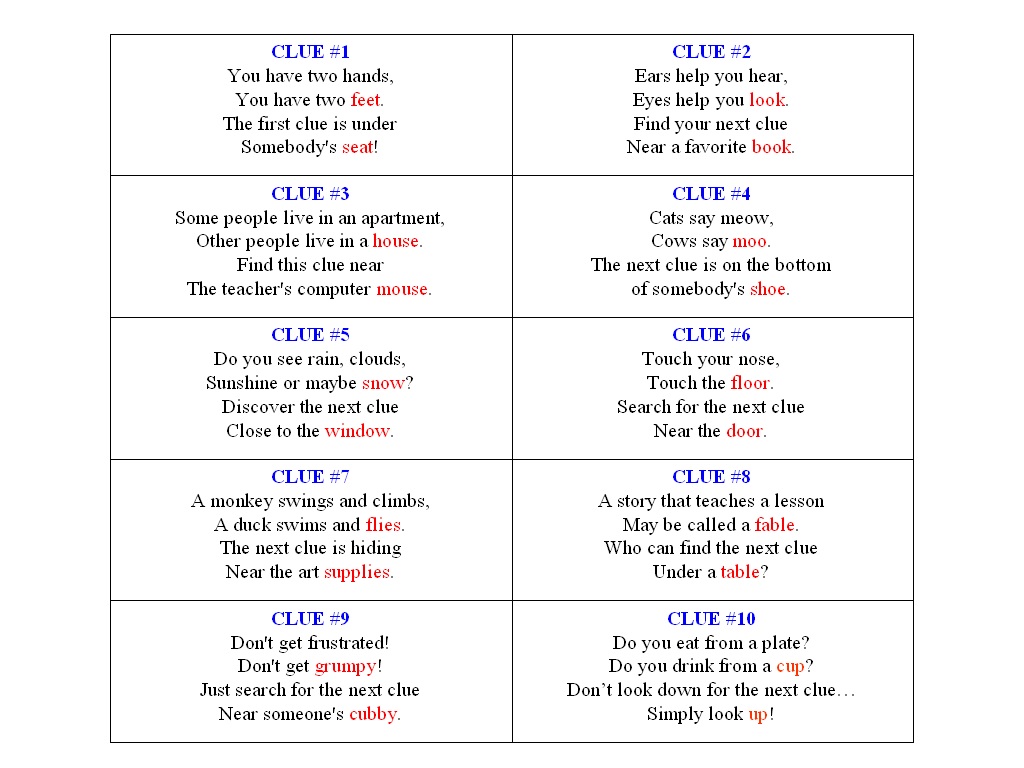
I have designed two sets of clues for this hunt. The first set has the answers to the riddles and would be well suited to the younger kids who cannot yet read. Of course, you can still have the younger ones guess - you'll just have the answer if you get stumped! The second set has blanks so that the kids can guess the rhyming word before beginning to search. Each set has a printable graphic and I've included the tables of clues at the bottom as well.

This scavenger hunt has ten clues. If you have more or less than ten children in the class, you might want to pair the kids or have them work together in groups to solve and find the clues.

Preparation while the kids are out of the room:
  1. Print the desired clues - click on the image and click on file-print.
  2. Cut out the clues and hide all but clue #1, placing #2 in the answer for #1, #3 in the answer for #2, etc.
  3. Print certificates and customize each with a child's name.
When the kids return, explain your rules for the hunt and begin by reading the first clue (or having the first child/group to read the first clue). Hide the last clue near the ceiling – you might want to tell everyone not to say anything until everyone sees that last clue. Then surprise the kids by presenting them with their very own scavenger hunt certificate!

Scroll to the bottom of this article to find the comment box. See more of Katrena's scavenger hunts, printables, and tips at the Wildflower Bouquets site map. Happy hunting!

Free Scavenger Hunt for Young Kids with Rhyming Clues by Katrena
Free Treasure Hunt for Teachers with Rhyming Clues by Katrena
Scavenger Hunt Rewards for a Job Well Done by Katrena Certificate Graphic from Art Explosion 300,000


CLUE #1
You have two hands,
You have two feet.
The first clue is under
Somebody's seat!
CLUE #2
Ears help you hear,
Eyes help you look.
Find your next clue
Near a favorite book.
CLUE #3
Some people live in an apartment,
Other people live in a house.
Find this clue near
The teacher's computer mouse.
CLUE #4
Cats say meow,
Cows say moo.
The next clue is on the bottom
of somebody's shoe.
CLUE #5
Do you see rain, clouds,
Sunshine or maybe snow?
Discover the next clue
Close to the window.
CLUE #6
Touch your nose,
Touch the floor.
Search for the next clue
Near the door.
CLUE #7
A monkey swings and climbs,
A duck swims and flies.
The next clue is hiding
Near the art supplies.
CLUE #8
A story that teaches a lesson
May be called a fable.
Who can find the next clue
Under a table?
CLUE #9
Don't get frustrated!
Don't get grumpy!
Just search for the next clue
Near someone's cubby.
CLUE #10
Do you eat from a plate?
Do you drink from a cup?
Don't look down for the next clue...
Simply look up!


CLUE #1
You have two hands,
You have two feet.
The first clue is under
Somebody's ____!
CLUE #2
Ears help you hear,
Eyes help you look.
Find your next clue
Near a favorite ____.
CLUE #3
Some people live in an apartment,
Other people live in a house.
Find this clue near
The teacher's computer _____.
CLUE #4
Cats say meow,
Cows say moo.
The next clue is on the bottom
of somebody's ____.
CLUE #5
Do you see rain, clouds,
Sunshine or maybe snow?
Discover the next clue
Close to the ______.
CLUE #6
Touch your nose,
Touch the floor.
Search for the next clue
Near the ____.
CLUE #7
A monkey swings and climbs,
A duck swims and flies.
The next clue is hiding
Near the art ________.
CLUE #8
A story that teaches a lesson
May be called a fable.
Who can find the next clue
Under a _____?
CLUE #9
Don't get frustrated!
Don't get grumpy!
Just search for the next clue
Near someone's ______.
CLUE #10
Do you eat from a plate?
Do you drink from a cup?
Don't look down for the next clue...
Simply look ___!

Tuesday, March 26, 2013

How to Make a Piñata With a Splash of Bright Colors

How to Make Easter Pinata © Katrena
When my 11-year-old daughter announced that her homework assignment for Spanish class was to make an Easter-themed pinata, I'll admit I was a bit apprehensive. Although I like crafts, this one was for a grade, and I certainly didn't want to steer my child in the wrong direction! My daughter wanted her pinata to look like a striped Easter egg, so we learned how to do this project together.

We rather rapidly learned what does not work. I would not suggest mixing rice flour and water for your bonding agent. Regular wheat-based flour might work, but rice flour does not have adhesive qualities like wheat-based flour. Our plan B had much better results as we tried plain old white school glue mixed with a little water. Frankly, I didn't measure, I just squirted about four tablespoons of glue and added a little bit of water. We covered the bowl of glue/water mixture each day and did not have any problems with the mixture drying or evaporating. We just stirred the mixture with a plastic spoon before starting each day.

If you are going to make a pinata, plan to work on it for several days. I banned my two younger daughters from touching the project and surrendered to a messy kitchen for a week, but we all survived and my 11-year-old was the proud creator of a colorful egg-shaped pinata at the end.

Supplies for Making Pinata © Katrena
Supplies
  • Balloon
  • Yarn
  • Hanger
  • Large bowl
  • Large trash bag
  • Newspapers
  • Long container
  • White school glue
  • Water
  • Colored tissue paper
  • Scotch tape
  • Scissors
  • Packing tape
  • Hole punch
  • Toys, candy, etc. for filling the pinata

Steps for Making Pinata © Katrena
Step-by-Step Directions
  1. Blow up the balloon to the desired size and tie a knot to keep the air in the balloon.
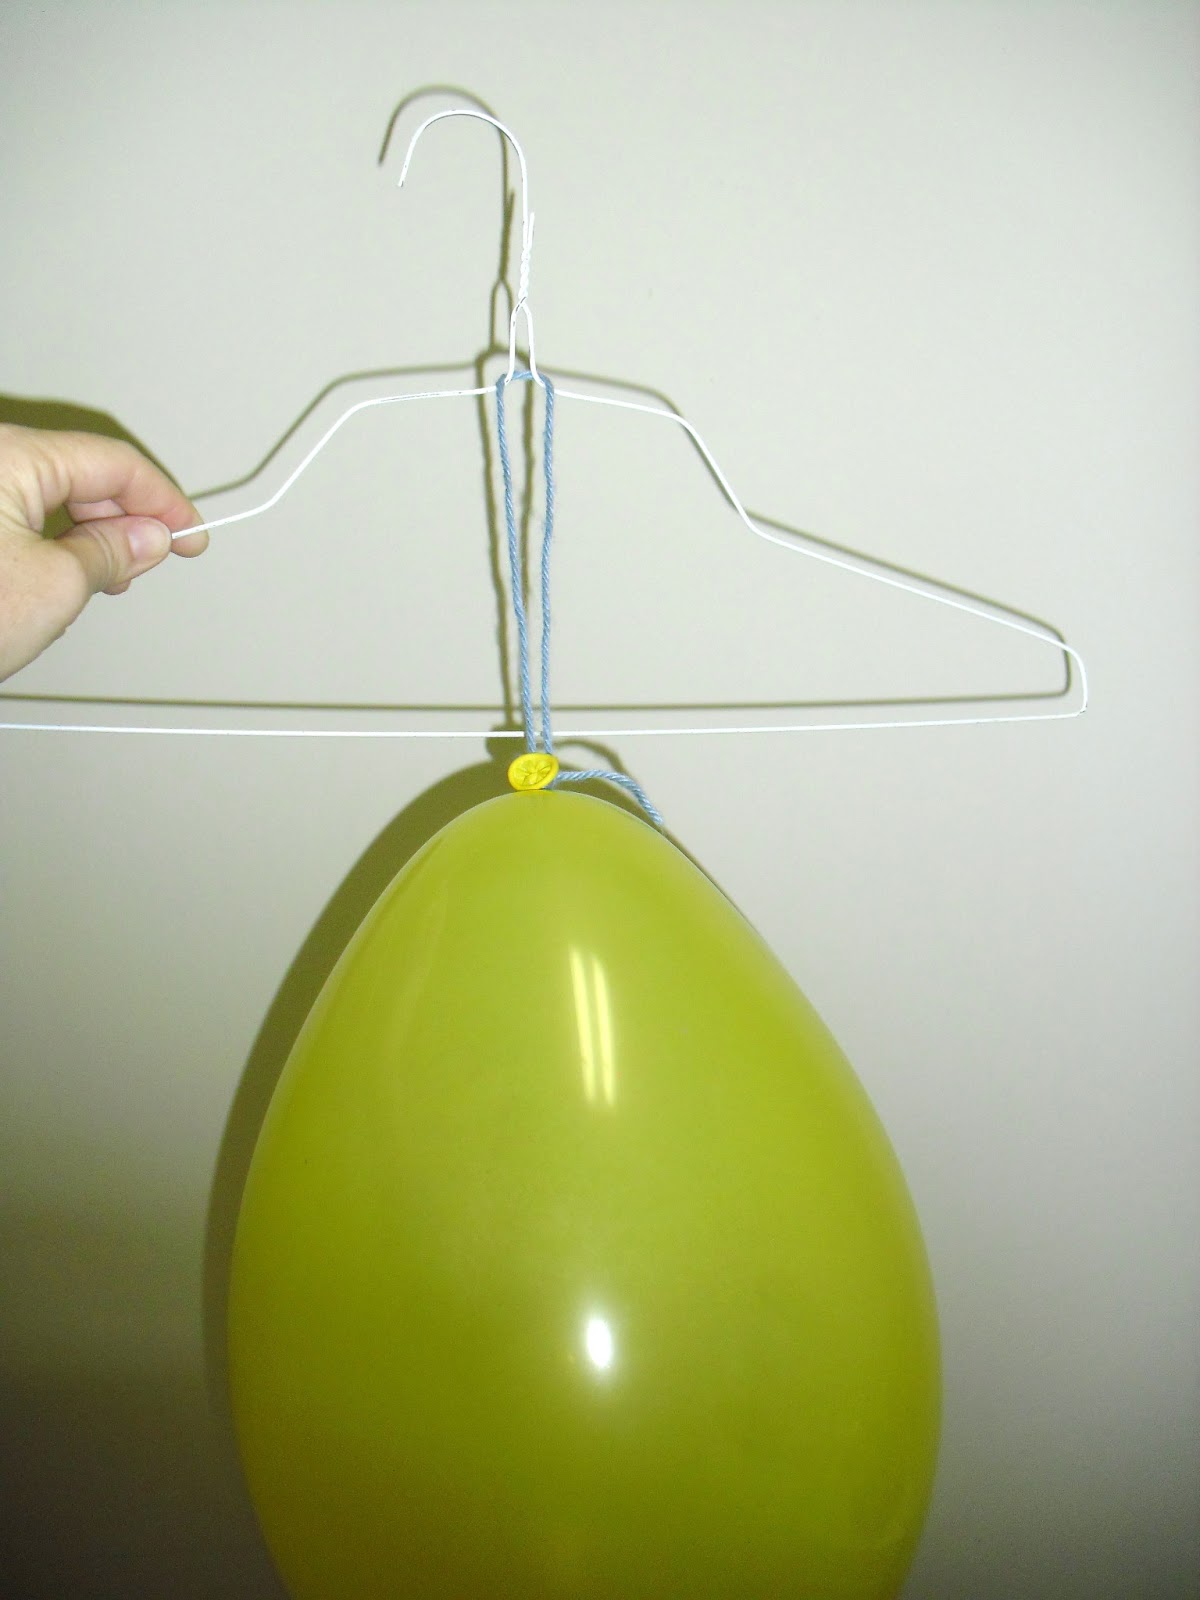
  2. Tie the yarn on the balloon's knot, then create a loop in the yarn and tie again.
  3. Hang the yarn loop over the hanger and suspend the balloon over your work surface.
  4. Cover the bowl with the trash bag and place under the balloon.
  5. Line your work surface with newspaper - this project can get a bit messy.
  6. Mix glue and water in the long container.
  7. Tear the newspaper into strips and submerge each into the glue/water mixture.
  8. Place the wet newspaper strips onto the balloon in a criss-cross fashion, making sure to leave about three inches at the top of the balloon uncovered. (See photo below.)
  9. Let the first layer dry - it will take hours for each layer to air dry completely.
  10. Repeat the layering process until you have about three to eight layers.
  11. Cut the colored tissue paper in half and then fold in half lengthwise.
  12. Create a quick "fringe" look by cutting the tissue paper, starting at the open edge and leaving the top two inches with the folded side uncut. (See photo below.)
  13. Use scotch tape or glue to place the tissue paper onto the newspaper covered balloon, starting at the bottom, ensuring that you cannot see the newspaper.
  14. Continue to layer the tissue paper in whatever color pattern you wish.
  15. Remove the pinata from the hanger.
  16. Pop the balloon and remove the balloon from the pinata.
  17. Reinforce the top layer with clear packing tape.
  18. Use the hole punch to make two holes, each one about two inches from the top, ensuring they are directly across from each other.
  19. Tie a piece of yarn through each hole, creating a hanger. (See photo below.)
  20. Fill the pinata with toys, candy, etc.
Find printables, scavenger hunts, and more kid-friendly activities at Katrena's Wildflower Bouquets web site map. Readers may also enjoy my Easter Egg Scavenger Hunt with clues.

Directions for Placing Newspaper on Pinata © Katrena
How to Make Colorful Pinata © Katrena
How to Make Hanger for Pinata © Katrena

Saturday, March 23, 2013

Easter Scavenger Hunt With Rhyming Clues

Easter Egg Scavenger Hunt With Rhyming Clues
This Easter treasure hunt offers some fun variety combined with solving riddles, hunting Easter eggs, and finding a hidden message! My three daughters, ages 11, 9, and 5, enjoyed this scavenger hunt with lots of surprises along the way.

You will need Easter eggs in multiples of 12 up to a total of 48 eggs and one basket for each child or team of children. This scavenger hunt may be played with one or more children and is well suited to indoor or outdoor play, depending on the weather and your own needs. You can vary the difficulty of the game through your choice of hiding places for the eggs.

While the children are in another area...
  1. Print the 12 rhyming clues and cut on lines. (Click on the images below to enlarge and then use File - Print.)
  2. Print answers to the clues if needed.
  3. Print any or all of the color-coded EASTER SUNDAY cards and cut on lines, placing one letter inside of each Easter egg.
  4. Hide the Easter eggs.
When the children return...
  1. Read the clues and ask for answers - arrange the kids on teams or call on children individually. (I had my three children to take turns so that each would answer four clues.)
  2. After all clues are answered, give directions about the number of eggs each child should find. For example, I have three children and hid twelve eggs, making the limit for each child four eggs.
  3. After the kids find all the hidden eggs, have them open the eggs to discover the hidden message. If you have printed more than one color, have the kids sort the letters by color first.
While playing this game, the kids can learn about teamwork, colors, counting, reading, rhyming, and perhaps a few new things about Easter.

Related articles:
Find more scavenger hunts, printables, and tips for enjoying time together with the kids at Katrena's Wildflower Bouquets site map.


Thursday, February 14, 2013

Katrena's Indoor Scavenger Hunt #6: Heart Treasure Hunt

Heart Themed Treasure Hunt with Rhyming Clues
This unique heart scavenger hunt includes lots of challenges but is simple and easily adaptable to different levels. I created this game as a Valentine's treasure hunt, but it can be fun to play any time of year. Educational information about the heart or circulatory system can compliment this indoor game nicely.

This is a short one with only five rhyming clues, but it can easily take as long as my scavenger hunts with ten clues if you hide the letters in challenging spots. One particularly fun part of this hunt is that the first letter of each riddle's answer also spells the word "heart." The kids might discover this as they begin to find the letters, which can add to the excitement. The game also encourages reading, rhyming, and problem solving. You can also incorporate teamwork and interdependence if you have several kids playing.

Because the clues only specify a room, you can play this game many times while making it new each time by choosing different hiding places within the rooms.

Directions for Heart Scavenger Hunt #6:

While the kids are in another area:
  1. Print clues #1-5 and cut on lines.
  2. Print answers #1-5 and cut on lines.
  3. Print HEART and cut on lines.
  4. Hide H in the bathroom.
  5. Hide E in the kitchen.
  6. Hide A in the hall.
  7. Hide R in the bedroom.
  8. Hide T in the living room.
Then:
  1. Give clue #1 to the person(s) who will be hunting.
  2. Once the riddle is solved, give the hunter(s) the matching printed answer with the room location.
Clues for Valentine Themed Scavenger Hunt
Answers for Heart Themed Indoor Treasure Hunt
Heart Reward for Katrena's Scavenger Hunt
To print:
  1. Click on the image to enlarge.
  2. Select File-Print.
  3. Two images will fit on one page.

I hope your family will love this scavenger hunt as much as my kids enjoyed it! You might also wish to read my Favorite Valentine's Day Craft Ideas article.

Find free scavenger hunts, printables, articles, and more at Wildflower Bouquets.